预测未来最好的方法就是去创造未来。——<亚伯拉罕·林肯>
介绍
端到端自动化测试是任何基于 Web 的应用程序开发生命周期的重要组成部分。
在本文中,我们将看看使用 Cypress https://www.cypress.io/ 的端到端测试。
“端到端”测试是指模拟用户体验和用户与服务交互的过程,并测试该过程中是否存在任何错误。
使用 Cypress 优缺点
优点
使用 Cypress 的最大优点很容易被 Cypress 的开发人员称为“时间旅行”。
它允许您在其命令日志和应用程序预览中查看测试中发生的所有事情,从而简化了调试过程。每一步都会显示应用程序在执行时的状态,让您可以在出现问题时精确定位问题。
我们将他们的认知感知的很大一部分建立在我们的视线上,而“时间旅行”使我们能够直观地(人为地)寻找错误,同时仍然给我们带来自动化的好处。
这也是一种非常自然的错误搜索方法,因为这是一个专注于端到端测试的框架,这意味着除了测试功能之外,我们实际上可以看到最终用户会看到什么。
您可能想要使用 Cypress 的其他一些原因是:
- 它不是基于
Selenium,所以它不存在相同的问题并提供了一个新的视角。Cypress是从头开始构建的。 - 高度关注端到端测试。
- 如果您可在浏览器中运行它,则可以使用
Cypress对其进行测试。 - 您只需要学习
JavaScript。 - 设置超级简单,速度快如闪电。
- 它是在考虑到测试驱动开发的情况下创建的。
- 大量官方文档。
- 您可以看到从浏览器发出的每个网络请求,并可以访问所有数据。
- 您可以存根任何网络请求,同时还可以创建任何网络请求(这意味着您也可以使用
Cypress进行API测试)。 - 积极和透明的开发人员 https://github.com/cypress-io。
Cypress建立在 Mocha 和 Chai 之上,它们都是现代流行的BDD和TDD库,因此实际上借用了一些语法。如果您以前使用过这些,您会注意到Cypress钩子是直接从Mocha来的。
不足
- 由于它不使用 Selenium 并且基于 JavaScript,因此您需要具备
JavaScript知识。Selenium支持JavaScript、Java、Python、Ruby 和 C#。 - 由于它非常专注于端到端测试,因此它不会成为您可以应用于所有其他类型测试(API 测试除外)的解决方案。
- 它不(也可能永远不会)支持所有浏览器(您可以在此处找到支持的浏览器列表)这可能是一个问题,因为某些类型的客户端可能会请求 IE、Opera 或 Safari 支持。
- 没有移动测试。
- 已知在使用直接 URL 导航时不稳定。
- 不能使用多个标签。
- 无法导航到不同的域 URL - 如果您的解决方案中有多个应用程序,或者您需要在第三方 UI 上测试某些内容,这可能是一个巨大的问题。您需要为其他应用程序保留一个单独的项目,或者完全依赖网络请求来获取数据。
- 相对较新,所以它没有像一些旧的测试工具那样多的社区材料。
- 对于您在应用程序中可能经常执行的某些操作,例如文件上传、悬停和滚动,某些路线图功能似乎已退居次要位置。您将不得不寻找解决方法。
- 如果您想要直接的数据库通信或直接浏览器工作之外的几乎任何事情,则需要进行大量工作。不过,他们正计划为其他语言发布后端适配器。本指南将在发布时及时更新。
使用 Cypress
Cypress 官网参考例子 https://github.com/cypress-io/cypress-example-kitchensink
1 | 安装 Cypress |
使用演示应用程序,执行如下:
1 | ## clone this repo to a local directory |
1 | ## launch the cypress test runner |
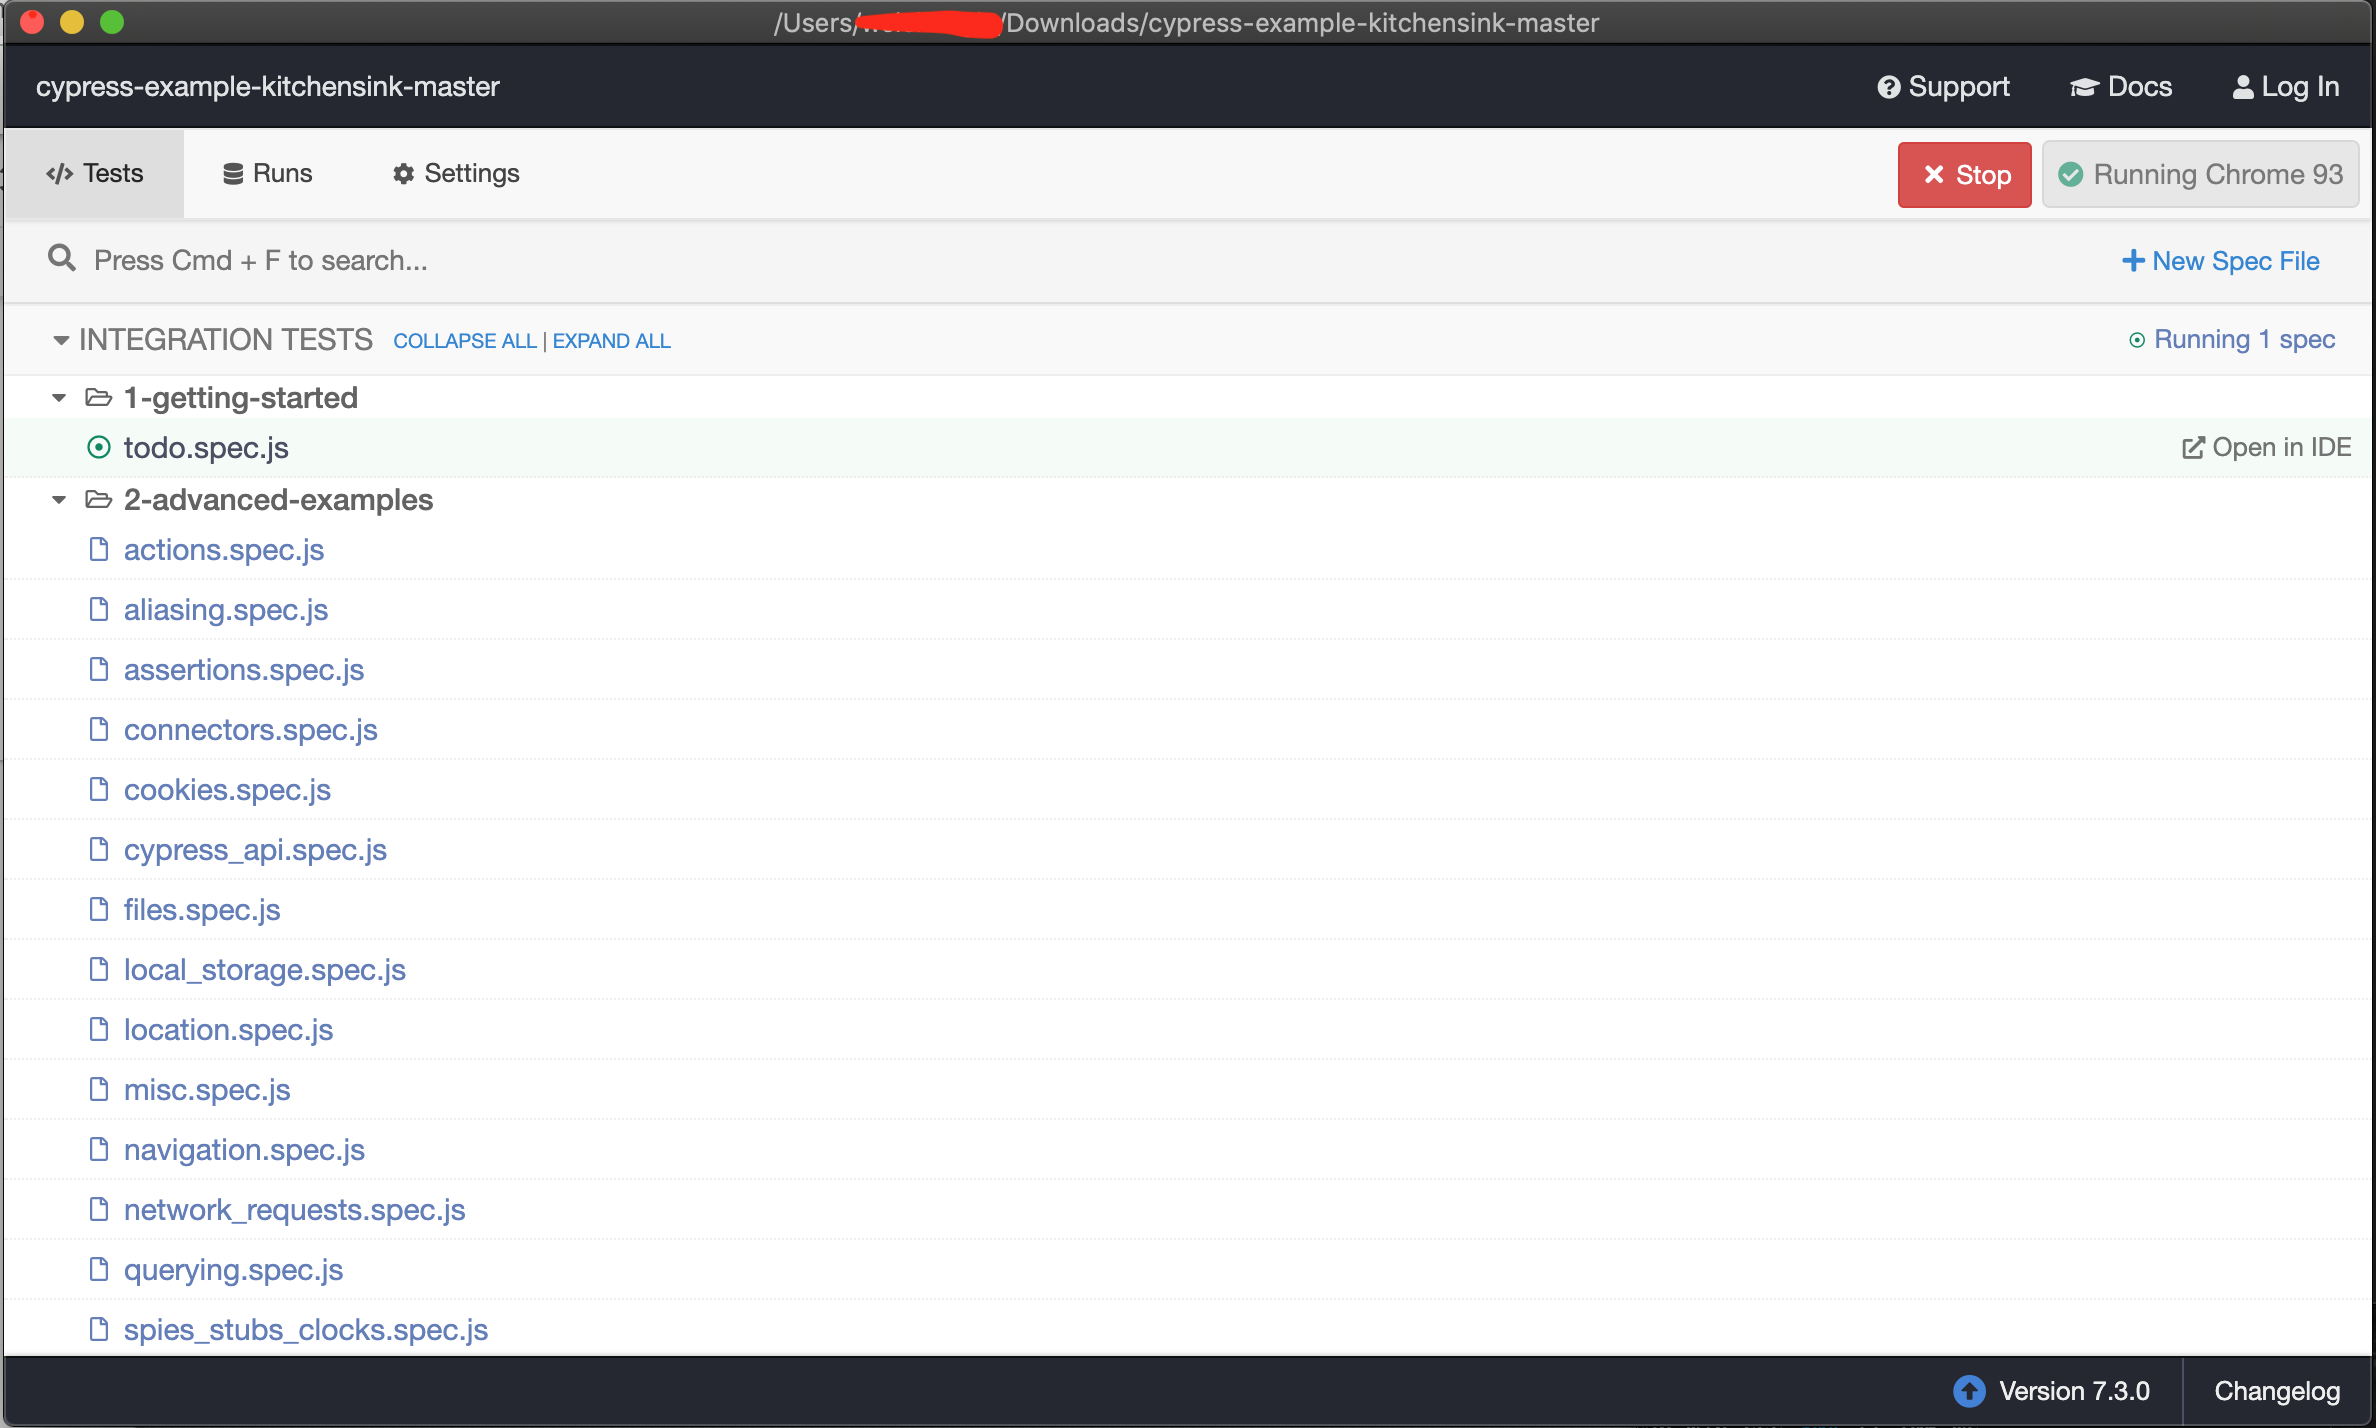
启动后如下:

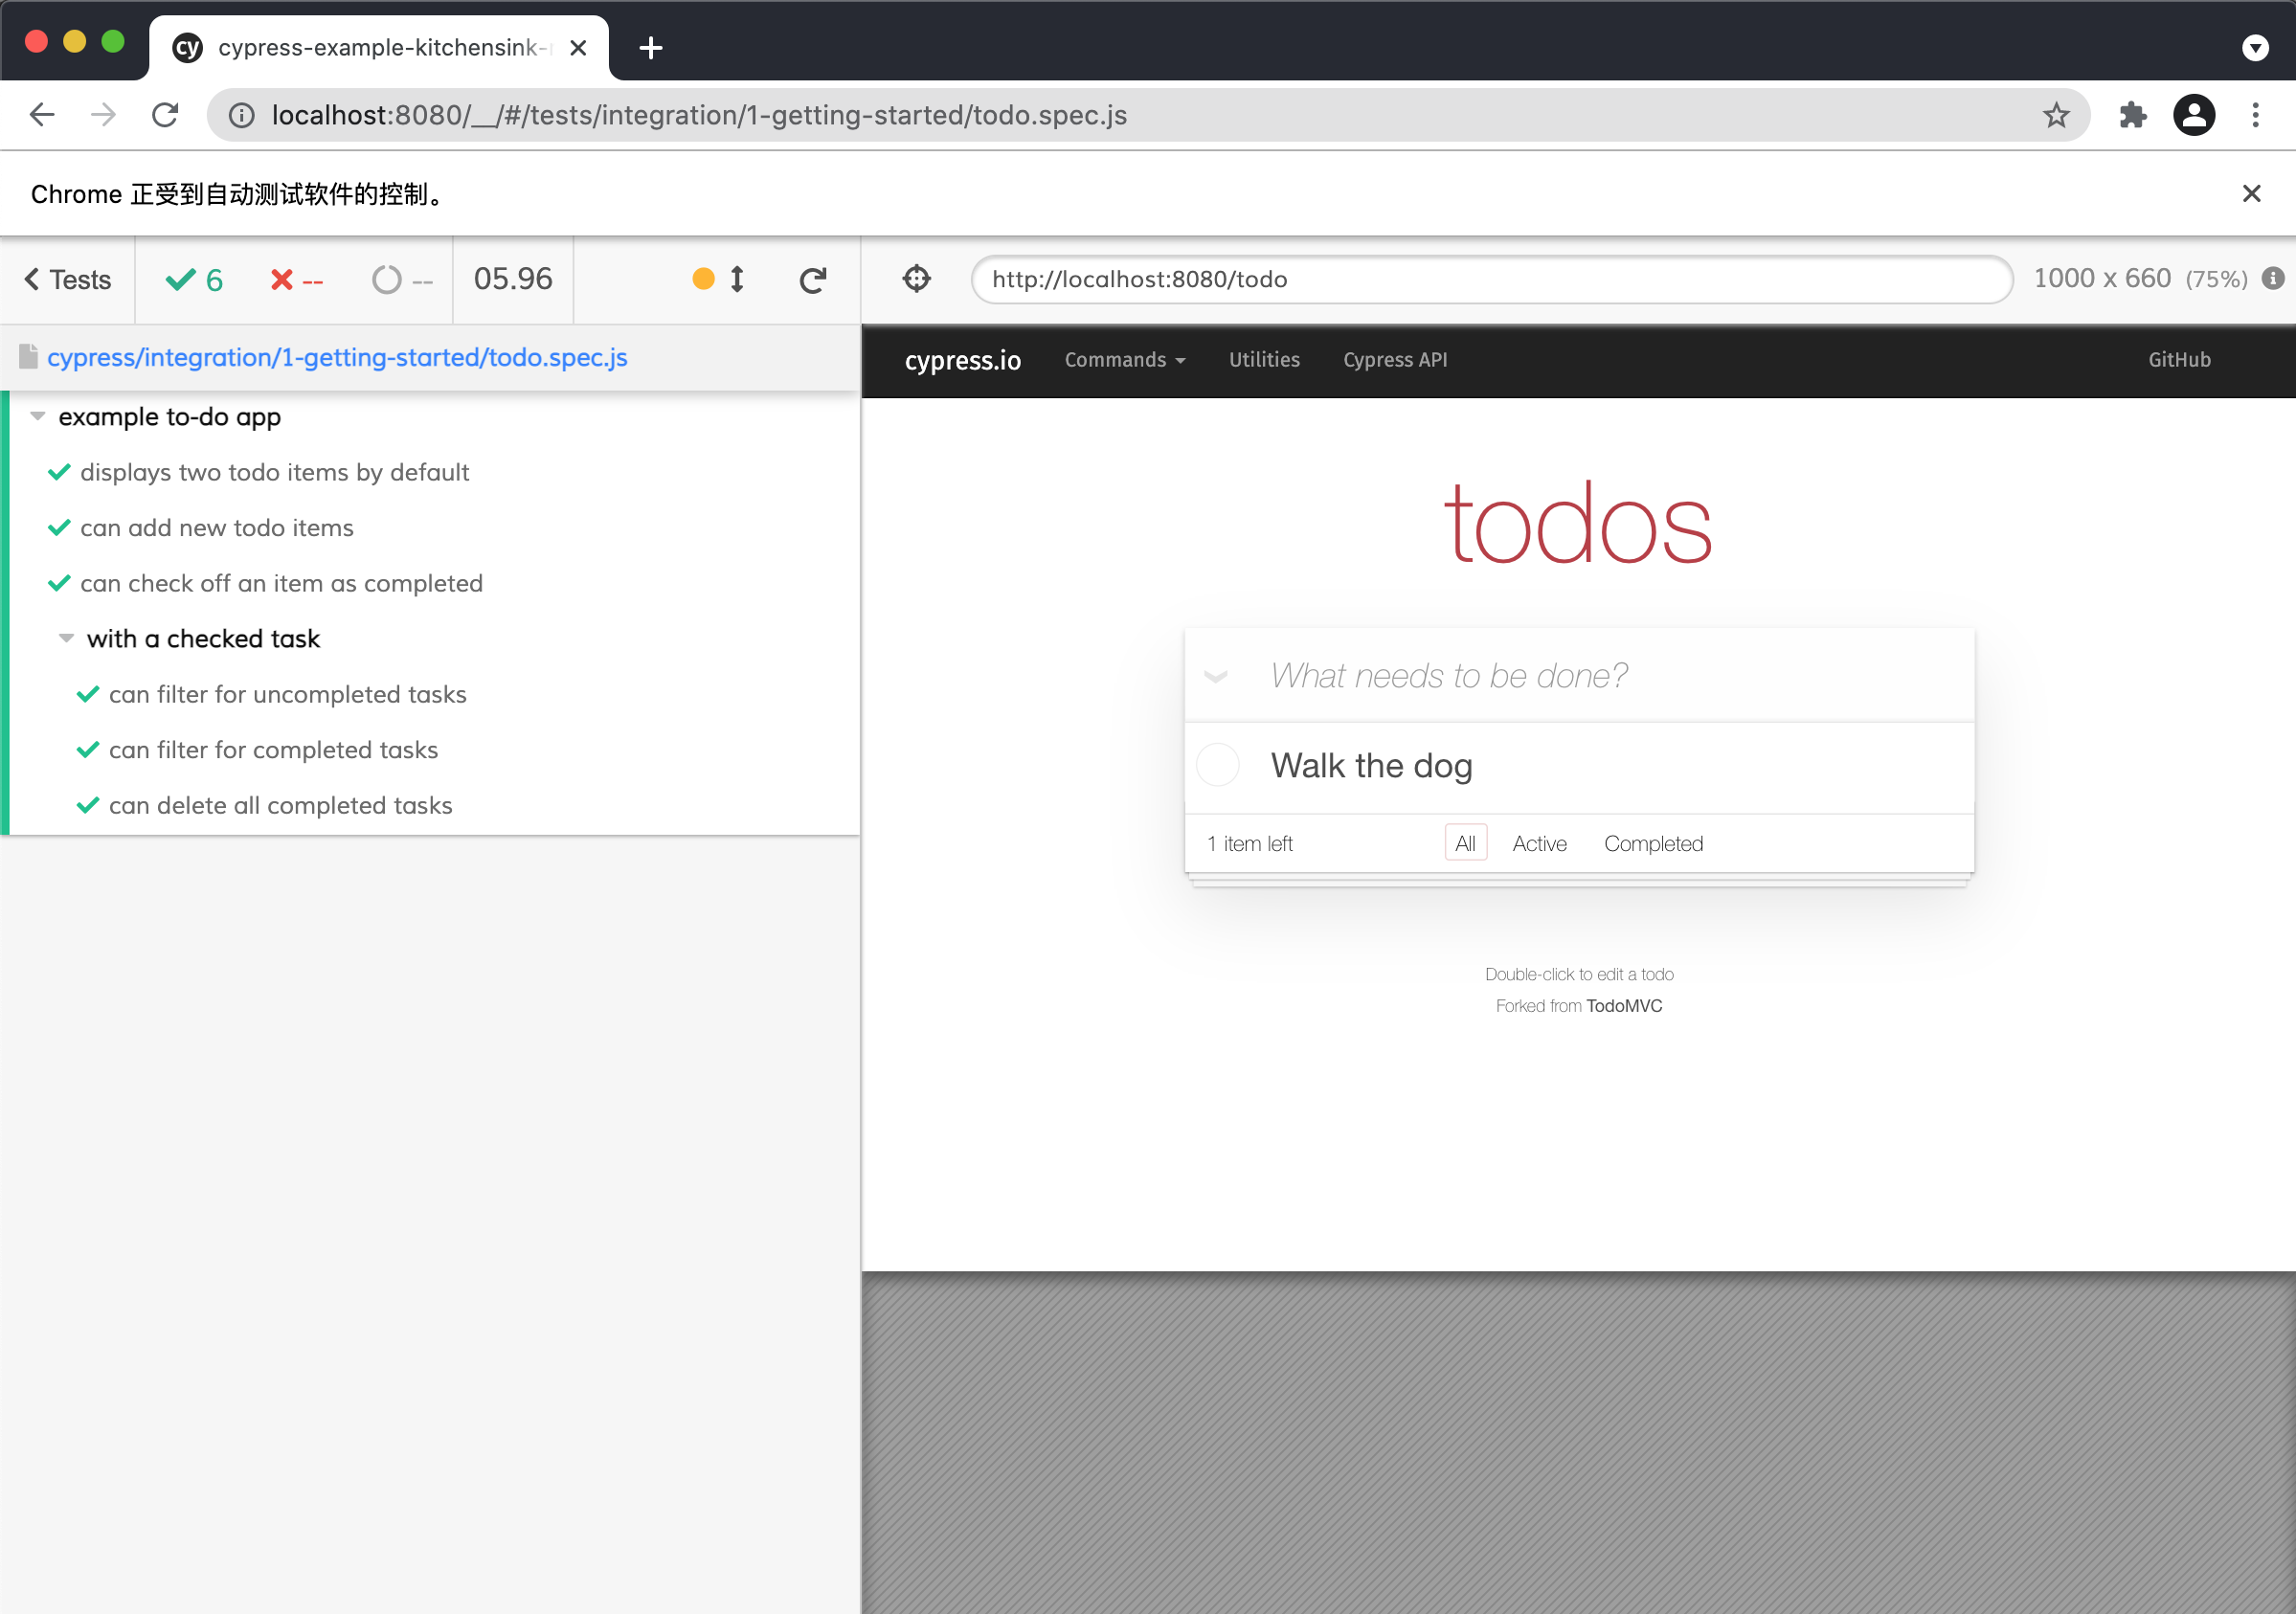
单击其中任何一个(例如 todo.spec.js)将启动:

Cypress API 和 样式
Cypress 建立在 Mocha 和 Chai 之上,并借用了它们的一些语法和特性。
也就是说,最显着的借用元素是describe(), context(),it() specify()方法。它们本质上是用于用标签注释测试组的实际测试方法的包装器。
值得注意的是,specify() it() 是同义词,就像 describe() context()。根据听起来更自然的内容,您可以使用这些的任意组合。
describe()用于为一组测试提供上下文,同时 it() 描述单个测试。通常,您会将它们嵌套在类似于以下的结构中:
1 | describe("Element X Testing", () => { |
在每个测试中,我们将依靠 Cypress 实例(cy)来运行各种方法,如visit(),get(),fixture(),等,以及链的方法对这些结果。
1 | describe("Testing CRUD Form", () => { |
最后,当您准备好运行测试时,您可以运行:
1 | $ cypress run --browser chrome |
将 Cypress 添加到项目中
配置文件,cypress.json 将在项目根目录中自动生成,默认情况下只包含项目 ID 的占位符:
配置 ( cypress.json) 文件
1 | "projectId": "4b7344", |
现在,让我们在 /integration 调用下创建一个新目录 my_tests 和一个名为 tests.spec.js . 您会注意到,在 Cypress 中,您已经会提示您选择运行这个新文件,因为它会响应性地扫描 /integration 目录以查找新测试。
继续在我们的tests.spec.js文件中定义几个测试:
1 | /// <reference types="cypress" /> |
模拟 XHR 请求响应
另一个需要注意的非常有用的功能是,您可以完全跳过上一节中创建评论的过程。您可以通过使用 stub 这个网络请求来创建您自己的模拟响应cy.intercept()。这在后端尚未开发时很有用,因此您可以在完成之前模拟响应,或者您只想测试应用程序的这一部分。
我们这里也有夹具文件的另一个用途。让我们创建一个mock_comment.json包含评论模拟数据的调用,并添加以下 JSON 内容:
1 | { |
现在,让我们intercepting_requests.spec.js在/my_tests目录下创建另一个文件。在这里,我们将拦截相同的端点,但将我们的夹具作为响应注入,完全跳过实际请求:
1 | /// <reference types="cypress" /> |
我们运行这个测试:
1 | $ cypress run --record --spec "cypress/integration/my_tests/intercepting_requests.spec.js" |
更多内容参考官网文档。
结论
Cypress 是一个很棒的新兴测试工具。它是超级轻量级且易于设置的,并且对于 TDD 来说非常棒,它构建在 Mocha 和 Chai 之上。它允许您完全模拟您的后端,这也非常适合在与后端集成之前进行测试,或者在您的后端尚不存在的情况下。在某些情况下,它还可以帮助塑造后端,因为它将准确勾勒出前端的期望。
但是,如果您正在寻找一种可以覆盖的范围非常灵活的工具,并且您需要一个大型的、个性化的和定制的框架,那么您可能希望坚持使用 Selenium。
参考
- https://stackabuse.com/end-to-end-testing-in-javascrpt-with-cypress/
- Cypress https://www.cypress.io/
- https://github.com/cypress-io/cypress-example-kitchensink
关注【公众号】,了解更多。

赞赏一下 坚持原创技术分享,您的支持将鼓励我继续创作!
 支付宝打赏
支付宝打赏 微信打赏
微信打赏